

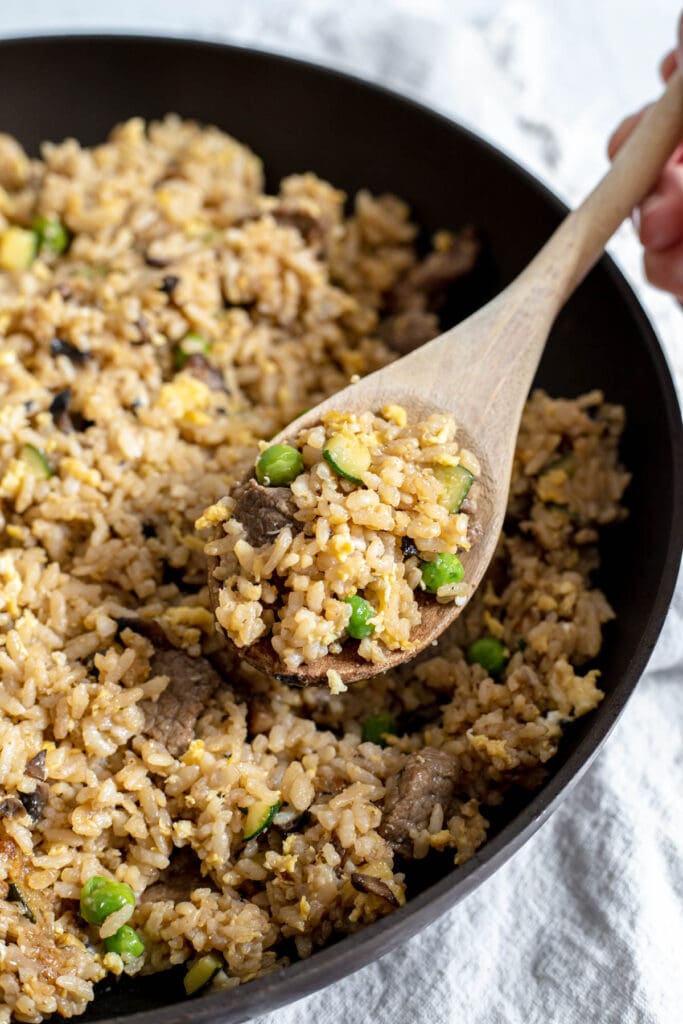
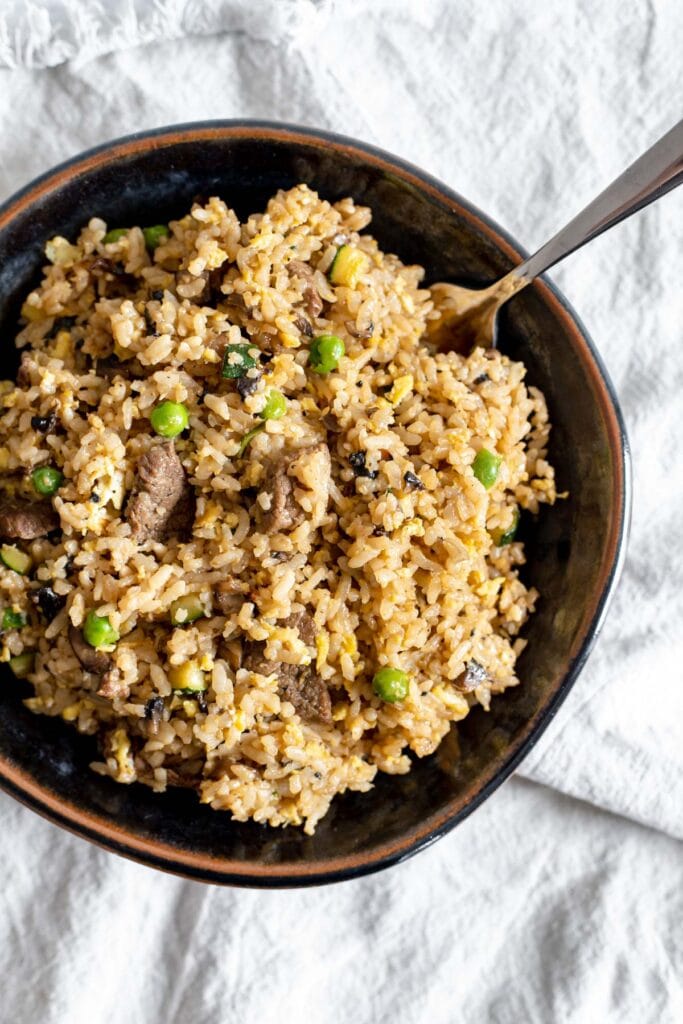
Skip the takeout tonight and try making this beef fried rice at home! Ready in less than 20 minutes, it's delicious on its own or served as a side.
Awesome. Very simple and super delicious. We loaded up on the veggie: cabbage, carrots, mushrooms, and onions. Thanks for sharing. ★ ★ ★ ★ ★
-Yvonne

Today, we are switching from sweet to savory to share one of my favorite recipes of all time: delicious and easy beef fried rice!
This recipe is actually my husband Kyle's go-to fried rice recipe. Tried and tested, it has been a staple in our kitchen for the past several years. And it honestly couldn't be easier to make!
Jump to:
Ingredients for this Recipe
While this recipe is pretty straightforward, it does call for a few ingredients you might not normally keep in your pantry. Here's what you'll need:
- Flank steak: Personally, I love to use flank steak for this recipe, but you could substitute in your preferred choice of meat (or leave it out for a veggie version).
- Onions, mushrooms, zucchini, and peas: These are my go-to vegetables in fried rice. Make sure to dice the onions, mushrooms, and zucchini well so that you don't have any big chunks! I also usually use frozen peas, but you could substitute in fresh peas if that's all you have on hand.
- Cooked rice: I used white rice for this recipe, but you could substitute brown rice as well. At home, I like to cook my rice in bulk in a rice cooker, and I use the rice in various recipes throughout the week.
- Soy sauce: For this dish, you can use either low-sodium soy sauce or the original version. Both will taste delicious!
- Mirin: I have to admit that I never cooked with mirin growing up, but now I don't know what to do without it. A slightly sweet Japanese rice wine, it pairs well with soy sauce and adds a unique flavor to fried rice. You can find mirin in Asian grocery stores or on Amazon.
- Sesame oil: Similar to mirin, sesame oil really enhances the overall flavor of the fried rice. Be careful not to add too much sesame oil, however, as the flavor is quite strong. Though typically in Asian grocery stores, you can also find sesame oil on Amazon as well.
- Eggs: The eggs are one of my favorite parts of fried rice! Just make sure they are fully cooked through before serving the dish.
Tips for Making This Recipe
Kyle and I have been making this fried rice for years, and we have picked up a few tricks along the way. Here are some tips to get perfect fried rice every time:
- Make the rice ahead of time. Whenever I plan to make this fried rice, I usually cook a big batch of rice the night before. If you use freshly-made rice, the fried rice might turn out soggy and sticky. Making the rice ahead of time and refrigerating it helps the rice dry out. If you have to make the rice the same day, I recommend spreading it out on a baking sheet after it's cooked so that it doesn't dry in large clumps.
- Customize your vegetables as desired. For this recipe, I used onions, mushrooms, zucchini, and peas, but don't be afraid to add in whatever vegetables you like! Peppers would go well with this dish, as well as scallions if you have them on hand.
- Dry up any excess water from the vegetables after cooking. To make sure the fried rice doesn't get soggy, I usually like to drain any excess water from the cooked vegetables before adding in the rice. To do this, I scrunch up a paper towel and use tongs to wipe it around the base of the pan. This is a simple step, but I find it really enhances the flavor of the fried rice in the end!
- Don't go overboard with the soy sauce. When making this fried rice, I usually aim for a light brown color with the addition of the soy sauce. If you add too much soy sauce, the flavor might be overwhelming. Start with the amount listed on the recipe, then taste the fried rice to see if it needs more.
Common Questions About This Recipe
Stored in an airtight container, this fried rice will usually last up to three days. While I like to warm it up to enjoy the next day, it's also delicious served cold.
No, you can easily customize this dish as needed. Try swapping in chicken, shrimp, or pork to get a delicious, alternate version of this fried rice. Or leave the meat out altogether for a veggie version!
Love this recipe? Please leave a star rating and review in the comments below! And don't forget to subscribe to The Baker's Almanac for even more baking recipes and tips.
Print
Beef Fried Rice
- Total Time: 20 minutes
- Yield: 4-6 servings 1x
Description
Skip the takeout tonight and try making this beef fried rice at home! Ready in less than 20 minutes, it's delicious on its own or served as a side.
Ingredients
- 1 teaspoon olive oil, divided
- 1 pound flank steak, cut into bite-sized chunks
- Salt and pepper, to season
- 1 onion, diced
- 1 cup mushrooms, diced
- ½ zucchini, diced
- 4 cups rice, cooked and chilled
- ½ cup frozen peas
- 4 tablespoons soy sauce + more as desired
- 2 teaspoons sesame oil
- ½ tablespoon rice vinegar
- 4 tablespoons mirin
- 4 eggs, lightly beaten
Instructions
- Cook the steak: Heat ½ teaspoon olive oil in a frying pan over high heat. Lightly season the flank steak with salt and pepper, then cook it on medium-high heat until the outside is lightly browned. Keep the steak in the pan for the next step.
- Add in the veggies: Add another ½ teaspoon olive oil to the pan, then add in the diced onions, mushrooms, and zucchini. Season with some more salt and pepper, then cook until the vegetables are soft and the meat is cooked all the way through.
- Fried rice time! Reduce the heat down to medium, then add the rice into the pan, followed by the peas, soy sauce, sesame oil, rice vinegar, and mirin. Mix thoroughly to combine and cook until all the ingredients are the same temperature.
- Finish it off with the eggs: Next, push the fried rice to one side of the pan to create an empty space for the eggs. Pour the eggs directly into the pan and scramble until they are cooked through. Once fully cooked, mix the eggs in with the rest of the fried rice ingredients. Taste and season with extra soy sauce, salt, and pepper if needed.
- Serve immediately, or refrigerate in a sealed container for up to three days.

Notes
- Substitutions: If you're not a fan of beef, try swapping in chicken, shrimp, or pork to get a delicious, alternate version of this fried rice. Or leave the meat out altogether for a veggie version!
- Storage: Stored in an airtight container, this fried rice will usually last up to three days.
- Prep Time: 5 minutes
- Cook Time: 15 minutes
- Category: Dinner
- Method: Sauté
- Cuisine: Chinese
Damn, rice vinegar isn't listed as an ingredient so I didn't buy it... suggestions? I don't have any vinegar.
Thanks for letting me know, and sorry for the confusion! I fixed the recipe so that it's listed as ingredient now. I would recommend just following the rest of the recipe as normal and leaving it out - it shouldn't affect the taste too much.
Awesome. Very simple and super delicious. We loaded up on the veggie: cabbage, carrots, mushrooms, and onions. Thanks for sharing..
I'm glad you enjoyed it! The more vegetables, the better 🙂