

Beautifully decorated cookies oftentimes look like a work of art, so why not preserve them as such? In this post, you'll learn how to preserve your cookies with polyurethane so that you can keep them for years and years to come!

Have you ever decorated just the most beautiful cookies in the world that it pains you to see them eaten? I know I've been there.
If so, you should consider preserving your cookies with polyurethane. When applied to cookies, polyurethane acts as a sealant that prevents the cookies from decomposing. Et voilà — beautiful cookies that last forever!
You can display the preserved cookies as a decor piece, or you can even attach ribbon to turn them into Christmas ornaments. No matter what you choose to do with the preserved cookies, this method is just a really fun (and easy) way to keep your beautifully-decorated cookies out on display for as long as possible.
Over the years, I've learned a few tricks when it comes to properly preserving cookies with polyurethane, so I wanted to round up all my best tips in this post.
Let me show you how to preserve your cookies!
How to Preserve Cookies with Polyurethane
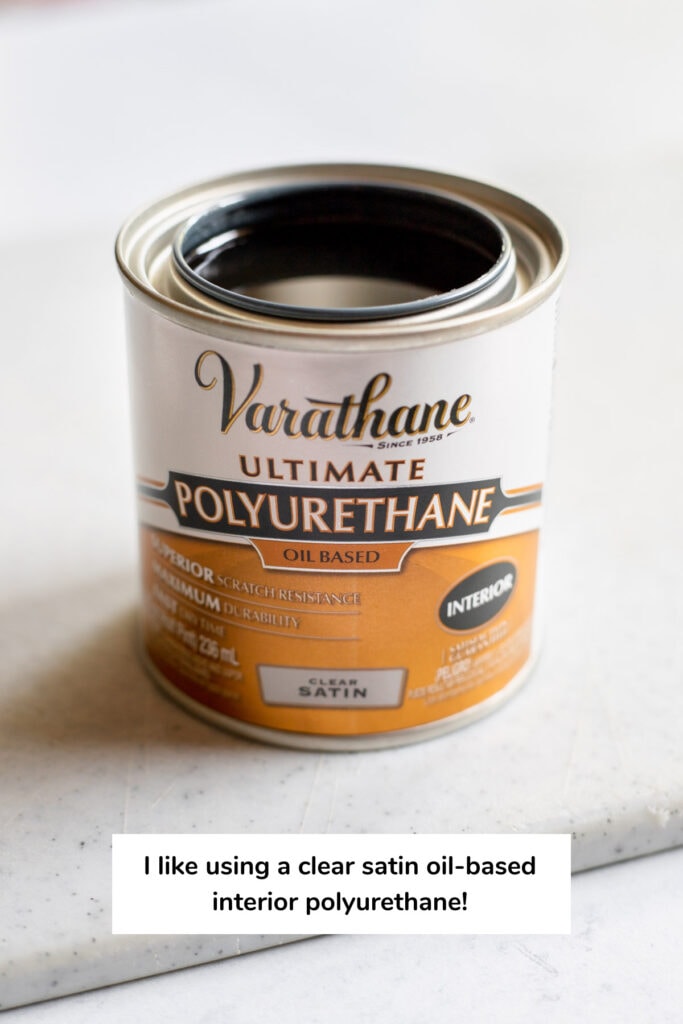
Polyurethane helps seal the entire surface of the cookie so that it doesn't decompose. If you want the cookies to look more natural, you can use a clear satin oil-based interior polyurethane. If you want more of a shiny look, opt for clear gloss oil-based interior polyurethane instead (semi-gloss works as well).
Follow these steps to properly preserve your cookies with polyurethane. Keep in mind that once you go through this process, the cookies will no longer be edible.
Here's what you'll need to do to preserve your cookies:
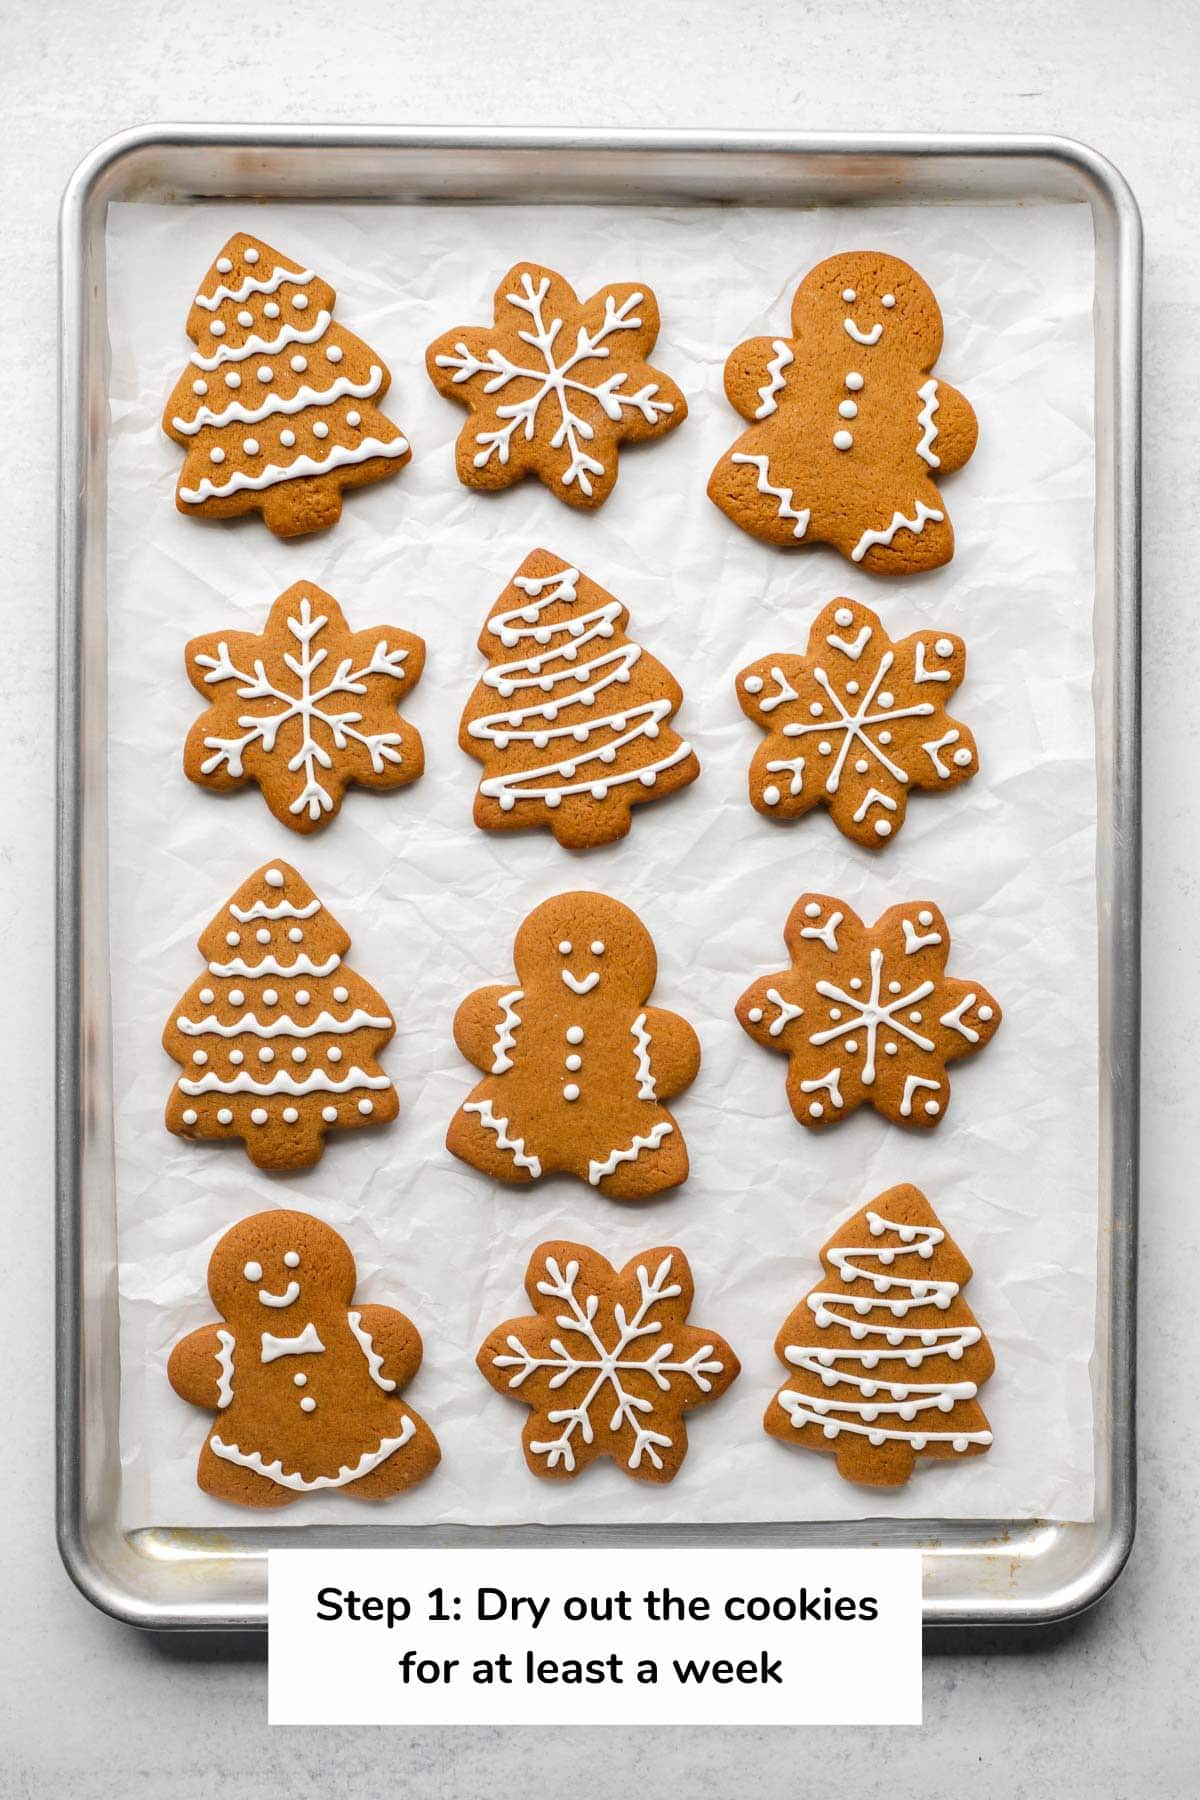
- Once baked, dry the cookies out for at least a week.
You want the cookies to feel hard to the touch before applying the polyurethane. I typically like to leave the cookies uncovered at room temperature during this week.

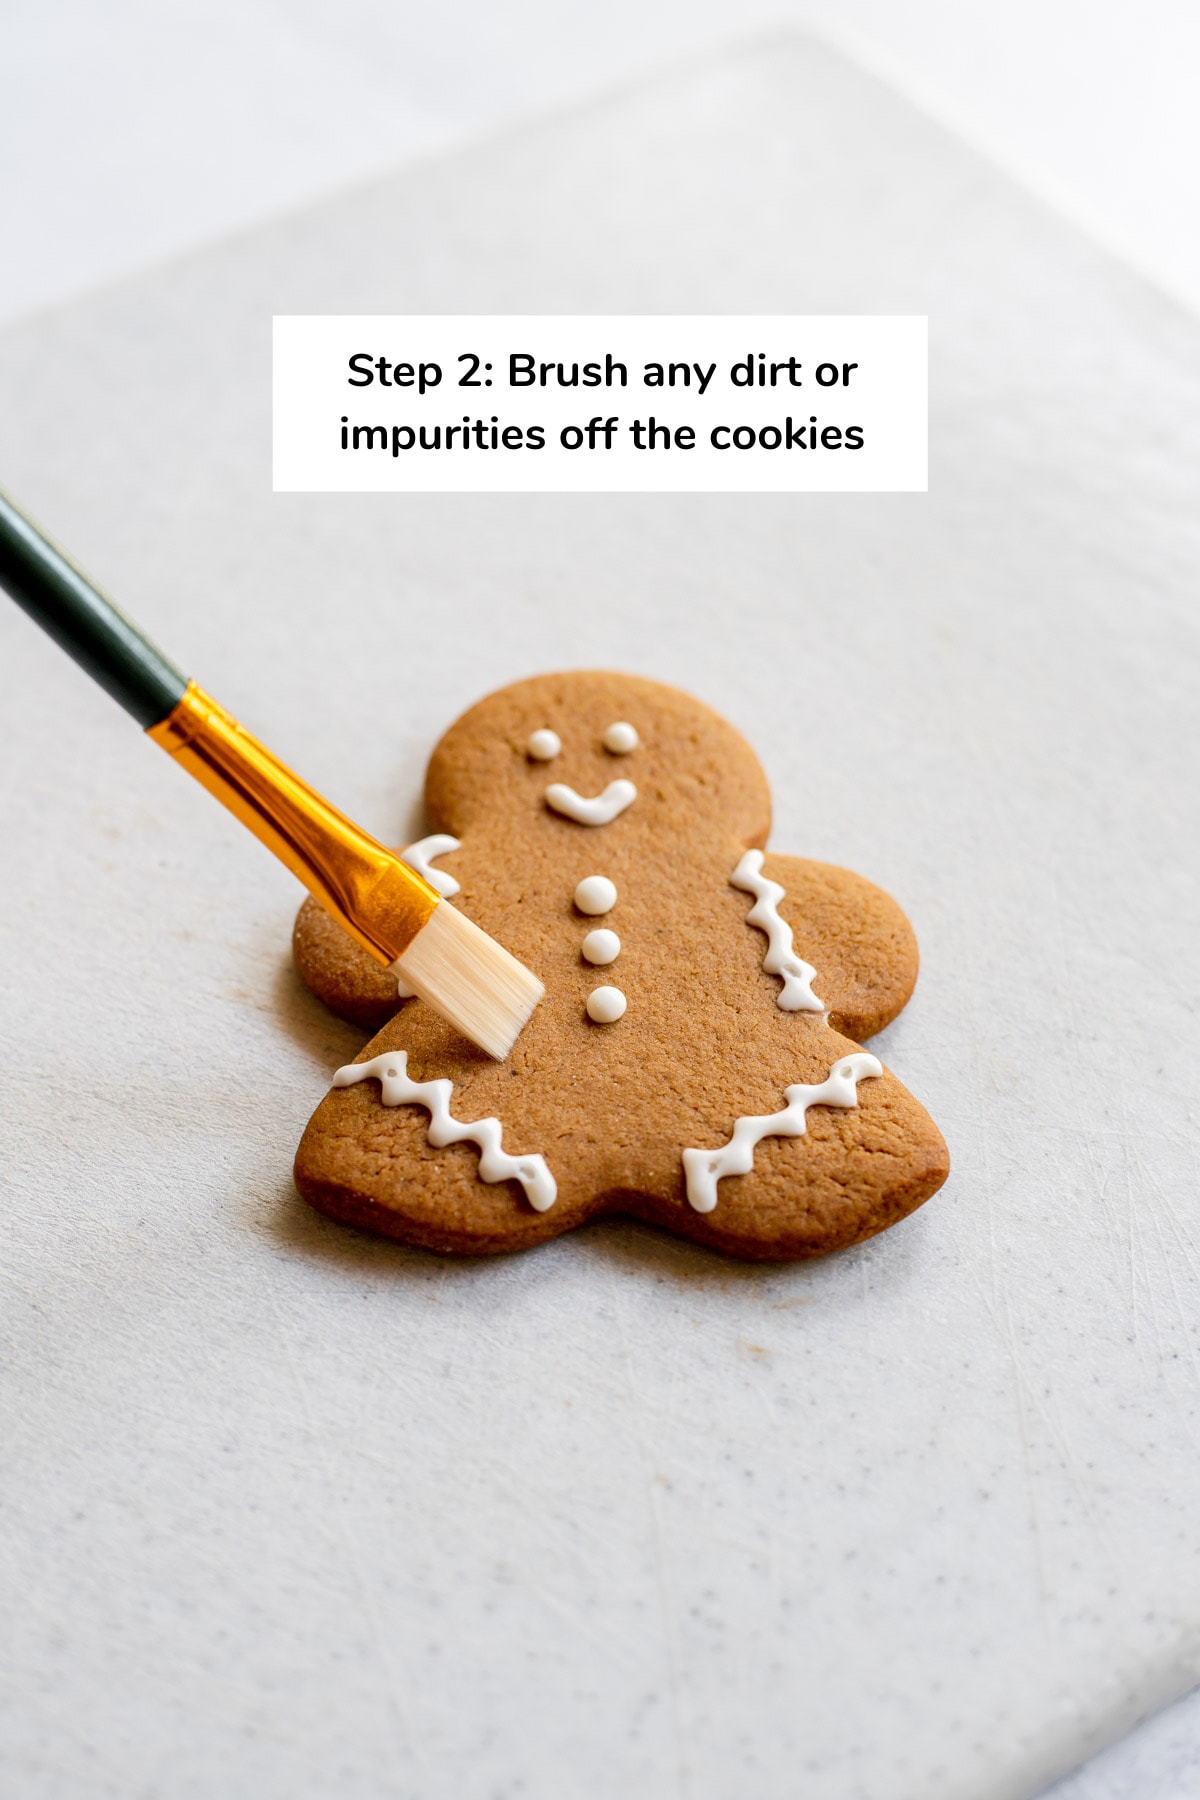
- After a week, use a paintbrush to brush any dirt or impurities off the cookies.
It's important to brush off all surfaces of the cookie to remove any dust, dirt, or other particles. If you skip this step, any particles will get stuck to the surface of the cookie once you apply the polyurethane.
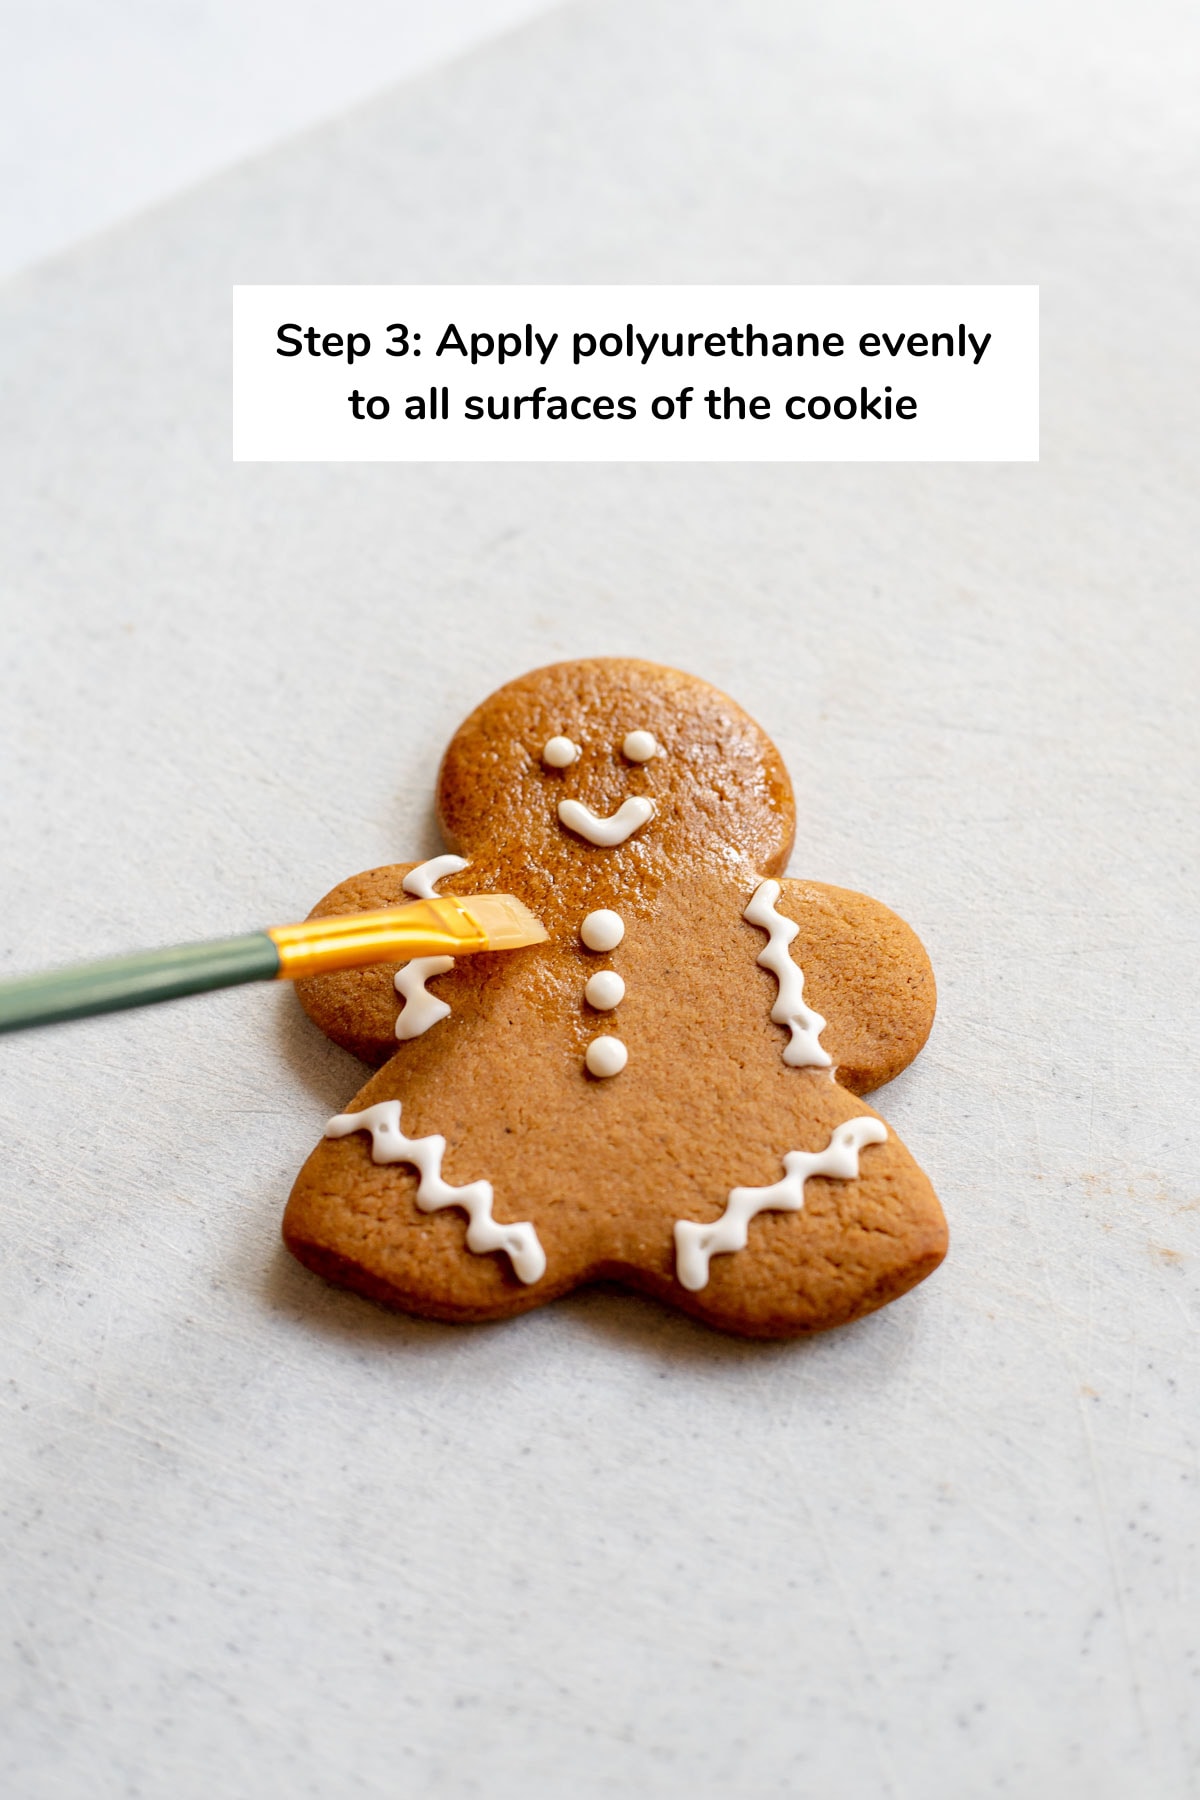
- Apply polyurethane evenly to all surfaces of each cookie.
Be sure to apply the polyurethane evenly to all surfaces of the cookies (the front, top, and sides). It's important to apply the polyurethane as smoothly as possible with the paintbrush so you don't leave any streaks or lines. Typically, I like to apply two coats of polyurethane to all sides of the cookie.
For best results, apply the polyurethane on one side of the cookie and let it dry overnight, then continue with the next side the next day. - Let the polyurethane dry for a couple of days.
Once you've completely applied the polyurethane, let the cookies dry completely for several days (or at least a minimum of 24 hours).
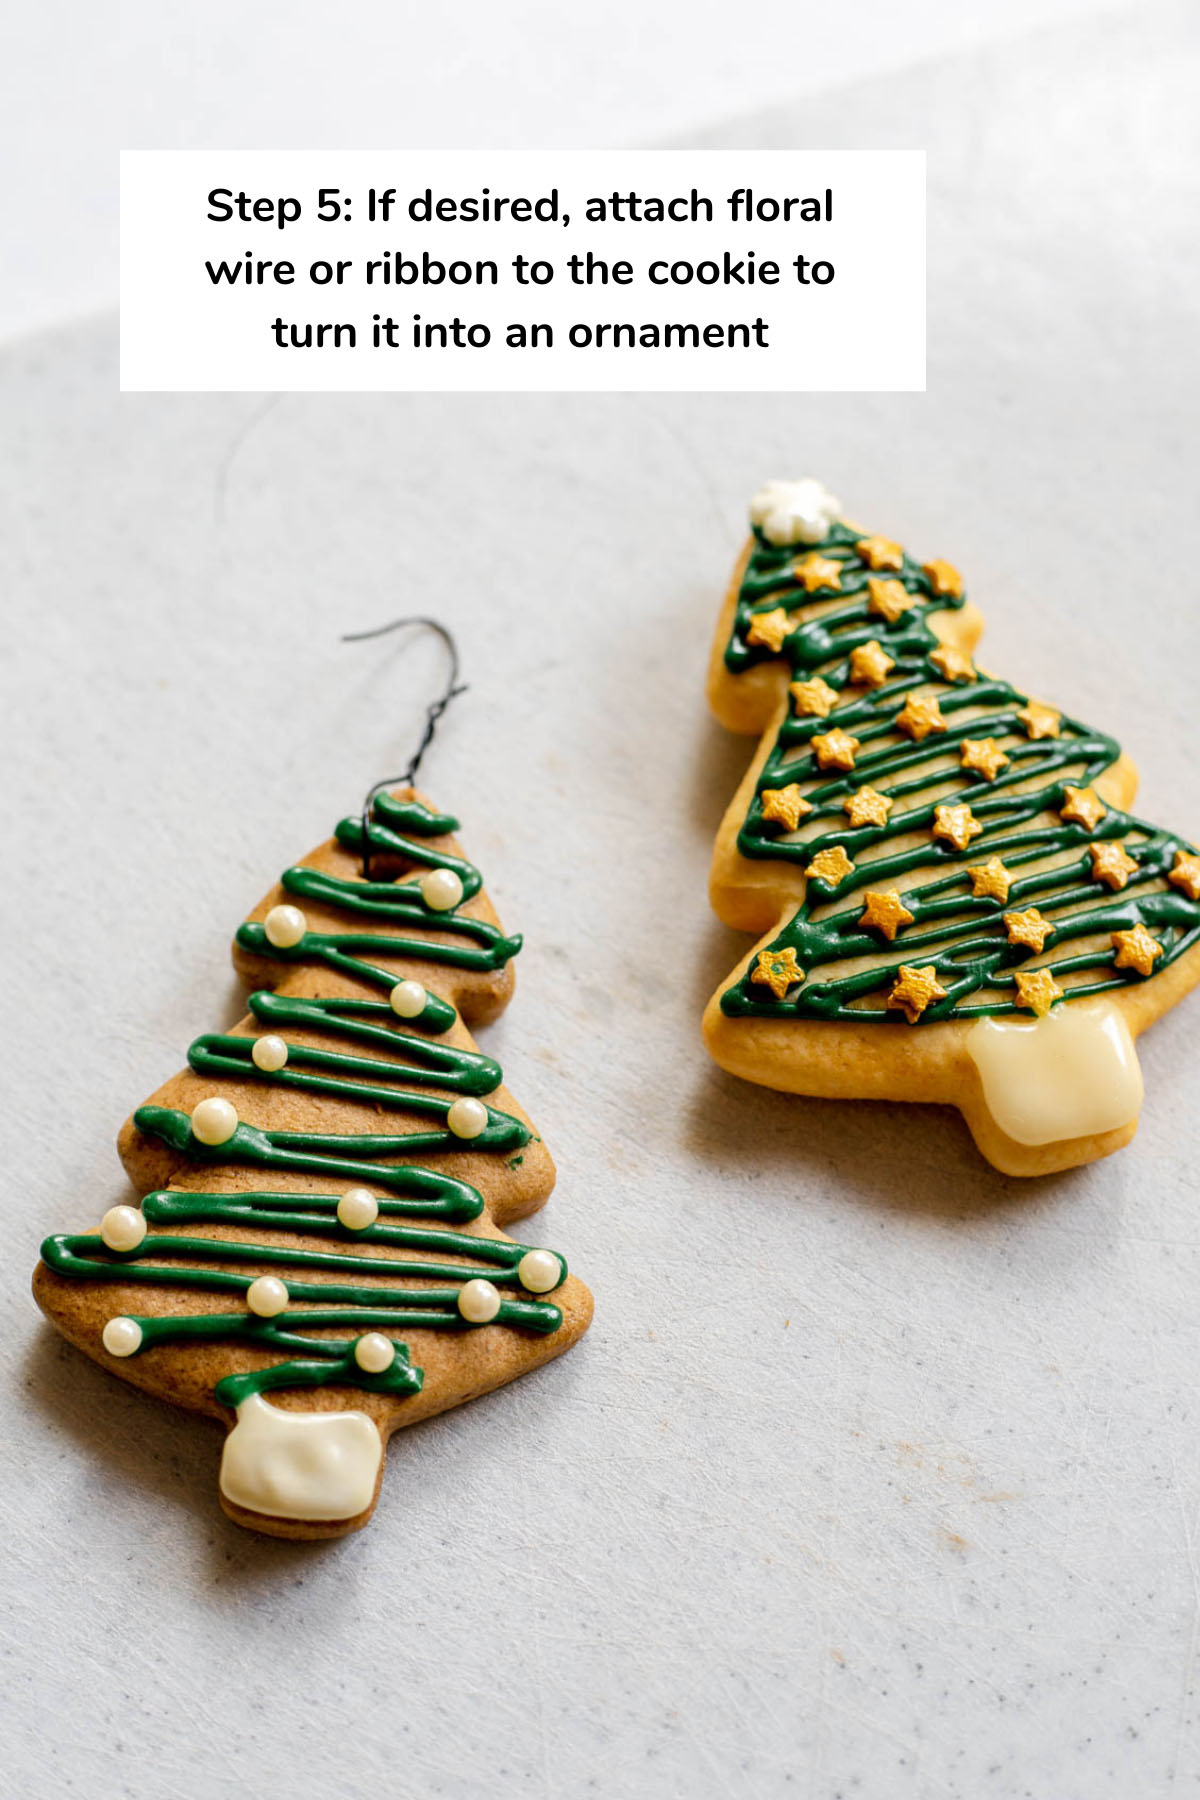
- If desired, attach floral wire or ribbon to the cookie to turn it into an ornament.
This is totally optional, but I wanted to mention it because I love preserving Christmas cookies as ornaments! To turn preserved cookies into ornaments, you can either attach floral wire or ribbon to the back of the cookies using superglue. Once secure, hang the preserved cookie on your Christmas tree as desired.
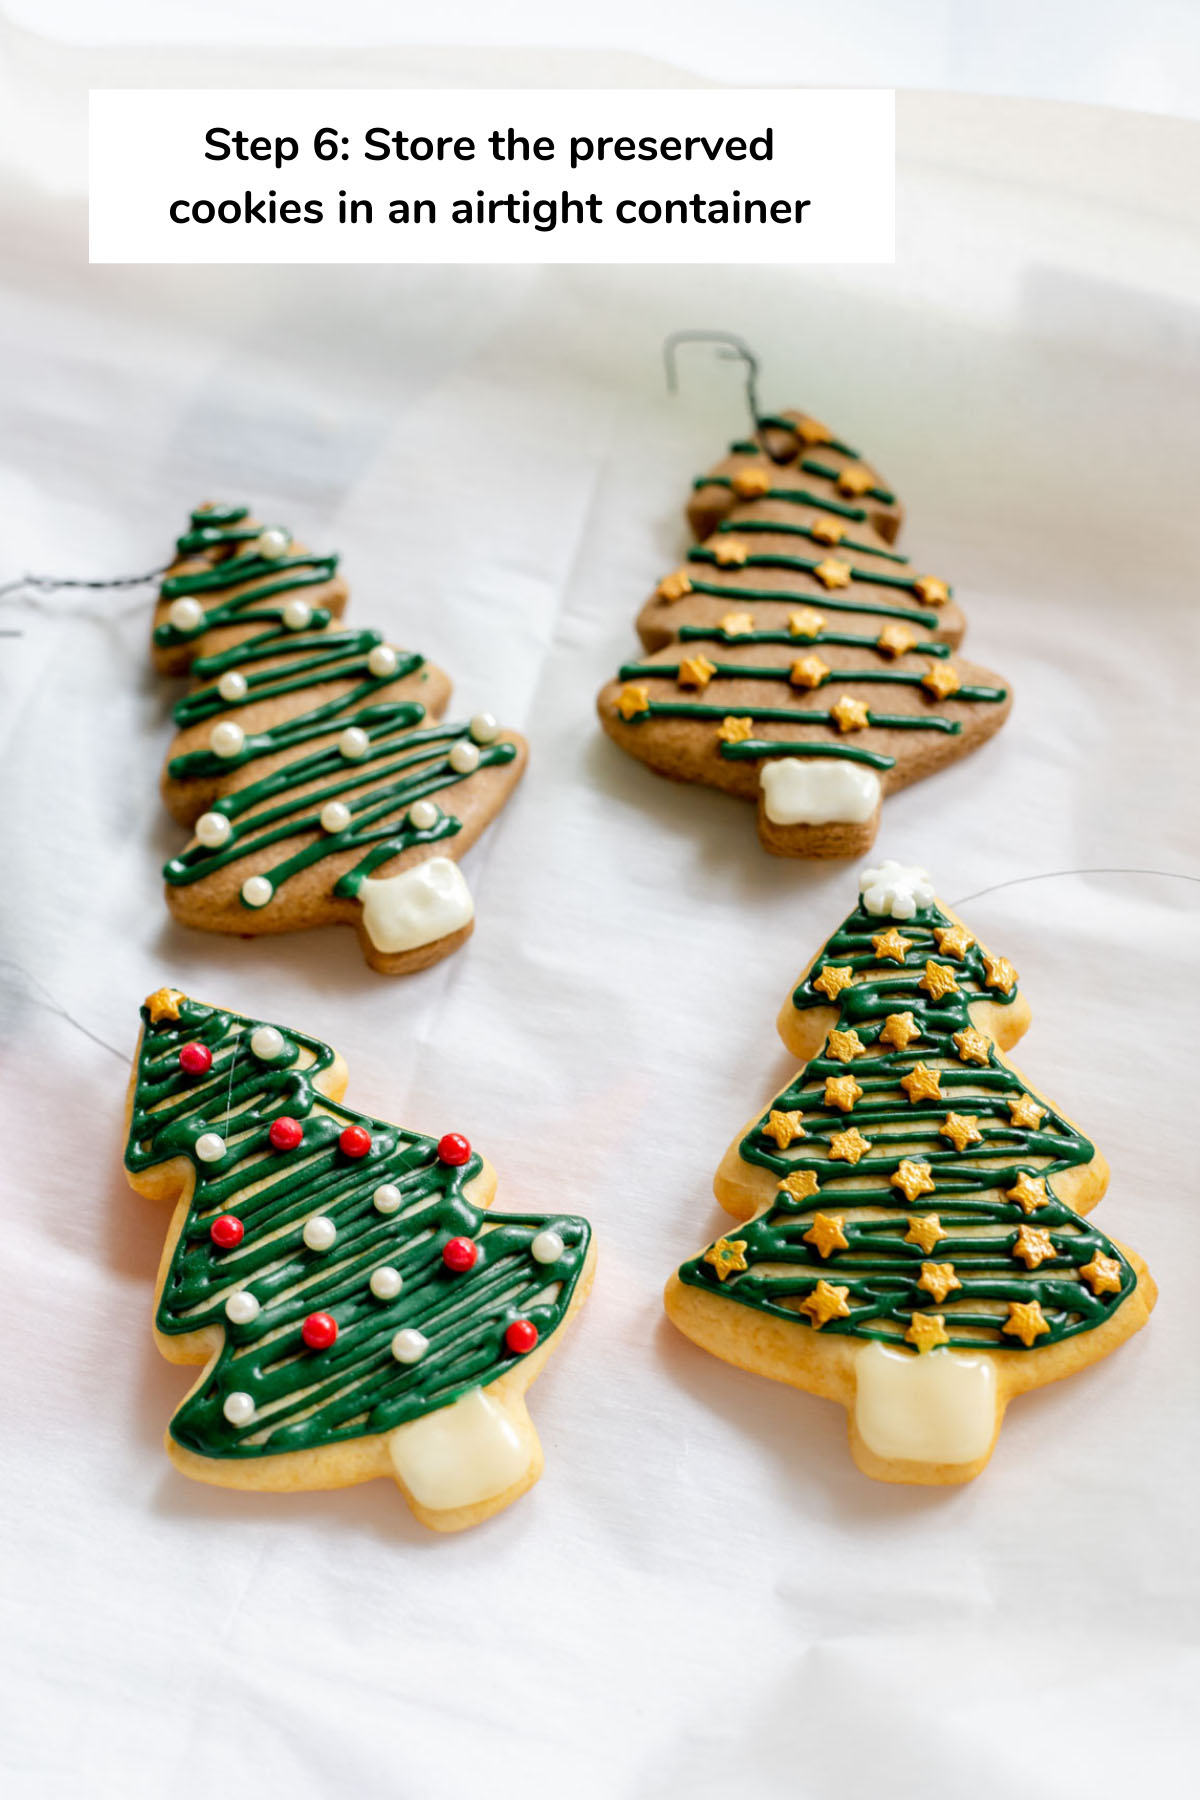
Alternatively, you can poke a hole into the cookie dough before baking, then attach a hook or ribbon through the hole once the cookie has been baked and preserved. - Store the preserved cookies in an airtight container in between layers of parchment paper.
To extend the life of your preserved cookies, store them in an airtight container. You can stack the cookies in rows with a piece of parchment paper in between each layer.
Also, nobody wants to get a mouthful of polyurethane, so be sure to mark the cookies as inedible to avoid any confusion later.

And that's the process that's worked well for me when it comes to preserving cookies! However, I'd love to hear if you have any cookie preserving tips or tricks of your own, so be sure to let me know in the comments below.
Happy cookie decorating (and preserving!)


Hello - I tried this for the first time and my cookies have been out for a week and the polyurethane smeared my black icing and it ruined the cookie. It worked on my white, iced cookies as well as the pink and green. Is black a “no-go” when it comes to attempting to seal the color? Thanks in advance
Hi, Kristin! I personally haven't tried this technique on cookies with black icing, so I can't say with certainty. However, I know that black icing does have a tendency to stain a bit more easily, so that could be why it ended up smearing. I'm glad the process worked on your cookies with the other colors, though. I'd be curious to hear if anyone else has had issues with black icing and preserving the cookies.
Hello, I have two questions.
1) Would Polycrylic work? I have it on hand and have used it for many crafts.
2) I wonder why you recommend storing in an air-tight container. Doesn't the polyeurethane seal out all moisture?
Thank you.
Hi there! I think Polycrylic would work for this project, but I haven't tried it before, so I couldn't say with certainty. Definitely let me know if you give it a go! An air-tight container definitely isn't 100% necessary, but I like to use it when storing the cookies just to make sure nothing damages them.
Thank you for the wonderful instructions and tips.
Our Great- Granddaughter made us cookies this year and I wanted to preserve some for Ornaments.
Thanks again for sharing I appreciate the knowledge.
Happy Holidays
I'm so glad you found the article helpful, Christine! Hope you had a great holiday season and start to your new year.
Does this have to be done outdoors?
Hi, Pamela! Personally, I did this process indoors, but you do want to make sure you're in a well ventilated area. You could certainly do it outdoors to ensure maximum safety — just make sure moisture doesn't get into the cookies while doing so. I hope that helps!
question. I know this article is old but I was trying your process and ran into a snag right away. As I was painting over the cookie, it started to melt the icing so it was smearing into other parts of the cookie. Can you use a pump spray bottle so you don't have to use a brush or have a bunch of overspray? I used a water base instead as that was recommended.
Hi, Barb! I'm sorry to hear you're running into issues preserving your cookies. I'd recommend only doing this process on cookies that have completely dried. You wouldn't want to do it on cookies that have frosting or icing that is soft to the touch, as this can cause the icing to melt or smear. I personally like to do this process with cookies that have been decorated with royal icing since it hardens quickly.
I haven't tried using a pump spray bottle for this process, but I think it probably would work well! You would just want to make sure you get into all the crevices of the cookies, which might be a bit more difficult with a spray bottle than a brush. I hope that helps, but please let me know if you have any other questions.
Following this guide just ruined the cookies I was trying to preserve. The post says to use oil based polyurethane but doesn’t mention that this will RUIN the color of the cookies by staining them amber. I used the exact same brand and model of polyurethane. I wished I had known that water based will dry clear but it’s too late for that now.
Hi Kevin — I'm so sorry you had issues with the cookies staining. This is the process I've always used when preserving cookies, and I've never had this happen before. I'll definitely look into this and give it another test to see if maybe the formula of the polyurethane changed or something. I'm so sorry you had this happen!
Mine turned yellow/brown as well ):
I'm so sorry to hear that yours have turned yellow, Tiffany. Did you use the products I recommended in the post? I'd like to look into this and see if I can figure out what's going on.
How to successfully put a hole through a baked and decorated cookie?
Hi, Marian! I wouldn't recommend poking a hole through a baked and decorated cookie as it is likely to break. Instead, you could you try attaching some floral wire to the back of the cookie with hot glue. I've done this before to turn preserved cookies into ornaments, and it has worked great. Let me know if you give it a try!
If you are afraid of damaging the front of the cookie just do the back first and front second.
That's a great idea, Carol!
Hi!
I heard shellac is another method of preserving cookies for ornaments. Have you ever heard of/tried this method?
I’m trying to determine which method is best for a custom cookie that was made for a baby shower. I only have one so I want to do it right!
Thank you!
Hi, Lane!
I've personally never tried using shellac to preserve cookies. From what I've read though, I think polyurethane might be the better choice. It seems like shellac is best used on surfaces where durability is not a top priority, whereas polyurethane is best when moisture is a concern.
That said, if you give shellac a try and have success with it, let me know! You could always try it out on another cookie first before deciding what to do with the custom baby shower cookie.
Hi Leslie,
Will do, thank you so much!
I might try it on a different cookie and let you know!
Thank you,
Lane
I know I’m too late here, but I hope you didn’t use shellac. Shellac discolors and turns an ugly (IMO) rotten pumpkin color over time. Oil based polyurethane will also darken but not as much. I’ve used water based polyurethane for floors and had excellent results. (The specific one I used is Bona Mega One. No discoloring, and dry to the touch in two to four hours. Mega One and Traffic don’t yellow or discolor over time.
Thanks for the info here, Sandie!
Can I use a water based polyurethane? I happen to have some of that on hand.
Hi, Shari!
I've never tried using water based polyurethane, but I think it would probably work. If you give it a try, let me know how it goes!
Hi!
Thank you for the article. It has been very helpful. I ended up purchasing the same polyurethane you used but I got it in spray form. I did a few coats as it didn’t looked sealed enough and now I’m noticing it is turning yellow! Is there any way to fix this? Do you know why this could have happened?
Thanks for your help,
Katie
Hi, Katie! I'm so sorry to hear you're having issues with the cookies turning yellow.
I haven't ever tried preserving cookies using spray polyurethane, so I can't say exactly how that would affect the process. When I'm applying the polyurethane, I use a paint brush to get it into all the crevices of the cookie. After you spray the polyurethane on the cookie, maybe try using that same technique to ensure it gets evenly distributed all throughout the cookie?
Let me know if that helps!
I was also wondering if you put the polyurethane on the back side of the cookie as well? And if you do, do you have it dry while it rests on the back of it or do you have it rest on the face of the cookie? I'm afraid of having it rest on the face of the cookie and damaging it.
Thank you!
Hi, Katie! I do put polyurethane on all surfaces of the cookies (front, back, and sides). I typically let the cookies dry out for a week or so before applying polyurethane to ensure that the icing has hardened. I also typically only preserve cookies that have been decorated with royal icing because it's so durable and dries hard. When applying the polyurethane to the back of the cookie, I typically just lay it flat. I hope that helps!
Oil based polyurethane all yellows over time, it’s unavoidable, just “the nature of the beast “. Most water based polyurethane wil still discolor, but much less than oil based. I refinish floors professionally and so have access to some that does not. I think the discoloration is less noticeable on gingerbread and darker cookies, but for things like sugar cookies water based would be the better option
Thanks for sharing this info, Sandie! I'll have to try out using water based polyurethane for sugar cookies and see if I have better results next time.