

With only four ingredients, this easy strawberry jam couldn't be easier to make — and it doesn't require any pectin! Packed full of flavor from fresh strawberries, it beats the grocery store version any day.
It tastes and smells divine! Not only great on toast for breakfast, but makes a real treat spooned over ice cream too! ★★★★★
-Jason

Have you ever tried making jam from scratch?
For the longest time, I was too terrified to give it a go, but I have found that jam is honestly easier to make than you would expect. You just need a few tricks up your sleeve!
And what better jam to make than fresh strawberry jam? It was always my favorite kind of jam growing up, so it brings me such joy to make it from scratch.
Let's make some strawberry jam!
Jump to:
What You'll Need
Here's a quick overview of some of the ingredients and tools needed to make this jam. The full recipe can be found at the bottom of the post!
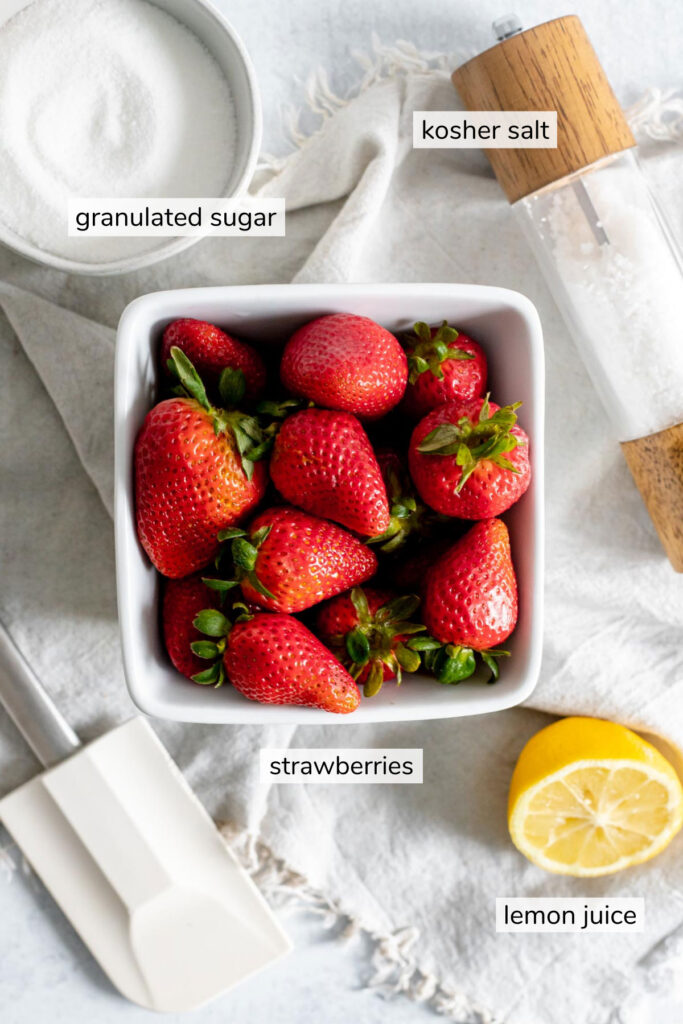
Ingredients
- Strawberries - You can use either fresh or frozen strawberries! Be sure to chop the strawberries as finely as possible for a smoother jam.
- Granulated sugar - Sugar helps jams set when cooking, and it also acts as a preservative, so be sure to use the full amount when making this recipe.
- Lemon juice - Since jam requires so much sugar, it's important to add a bit of lemon juice to cut the sweetness.
- Kosher salt - Last but not least, don't forget a pinch of salt!
Equipment
- Medium saucepan - To make this recipe, you'll want to cook all the ingredients in a medium saucepan. The jam will bubble up as it cooks, so it's important to use a saucepan with higher sides.
- Heatproof spatula - To keep the jam from sticking to the bottom of the pan, you'll want to constantly stir it using a heatproof spatula. I personally like to use silicone spatulas when making jam since they're so flexible and can last a long time.
How to Make This Recipe
Now that you've got your ingredients ready, let's make some strawberry jam! Here's a quick overview of how to make it:
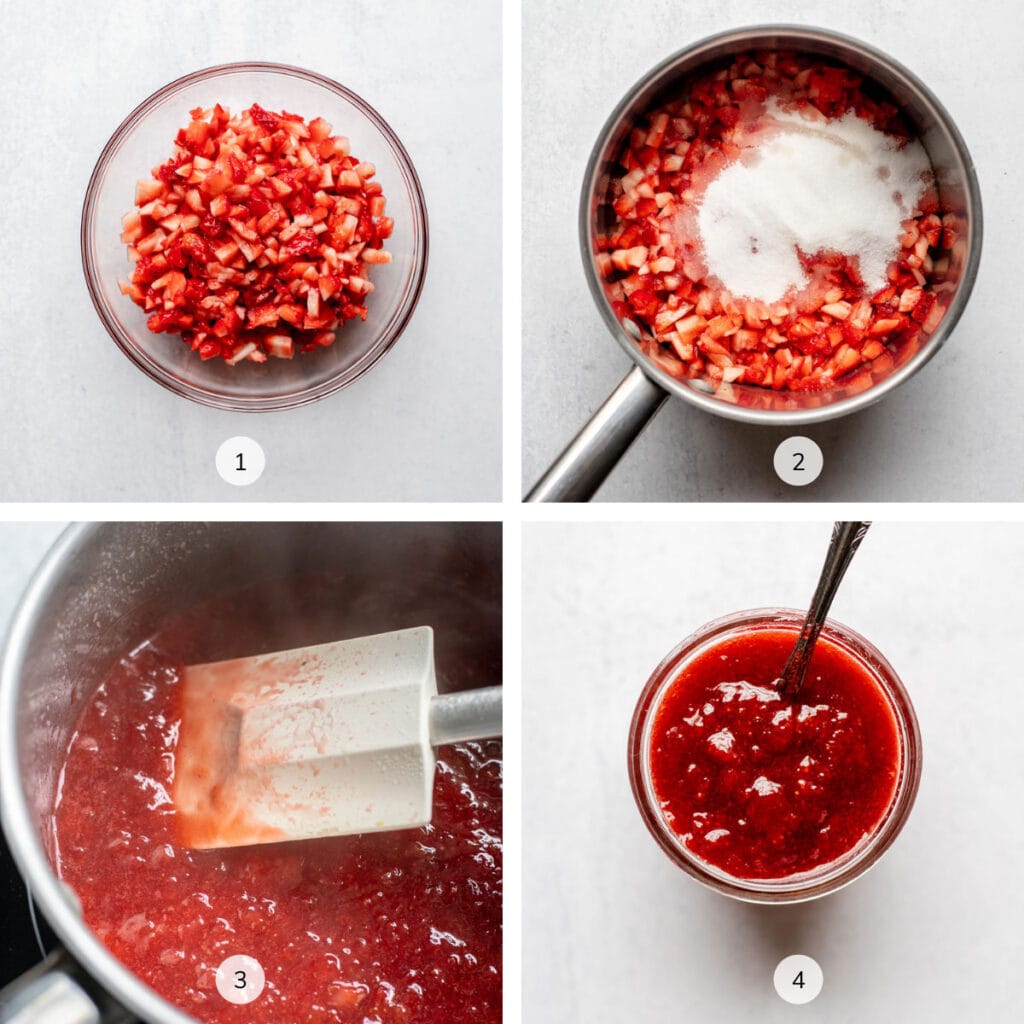
1. Finely chop the strawberries. You don't need to be too exact when doing this — just try and chop the strawberries as small as possible. The larger the strawberries are, the more chunky your jam will be. (Image 1)
2. Combine all the ingredients in a medium saucepan. Stir everything together, then heat the mixture over high heat and stir constantly with a heatproof spatula. As the mixture starts to bubble up, reduce the heat to medium-low. (Image 2)
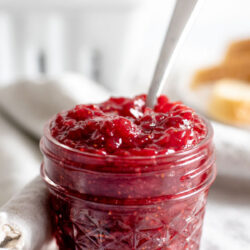
3. Cook the jam until it is thick and viscous. The cooking time will depend on your stove and heat, but this process usually takes me 10-15 minutes. To test if the jam is ready, I usually like to run my spatula along the bottom of the saucepan in a straight line. If it takes more than a second for the line to fill back up, the jam is ready to come off the heat. (Image 3)
4. Remove the jam from the heat and transfer it to a heatproof container. Let it cool completely at room temperature, then transfer to the fridge. (Image 4)
Tips to Make Perfect Strawberry Jam
Here are a few tips to keep in mind when making this recipe:
- Cut up the strawberries as small as possible. To be honest, this part takes the longest in this recipe, but I promise it's worth it. If you use larger chunks of strawberry instead, the jam will end up a lot chunkier.
- While the jam is cooking, stir frequently with a heatproof spatula. As the jam cooks, it can easily start to burn on the bottom of the saucepan. By stirring the jam frequently, you help distribute it evenly throughout the saucepan and prevent any burning.
- Make this jam in small amounts. When it comes to making jam, I don't recommend doubling or tripling the recipe. If you try and make too much jam at once, it's easy for the fruit to overcook. Instead, you'll want to make this jam in several batches if you want to increase the amount.

Common Questions About This Recipe
These are some questions I frequently hear about this jam. If you have a question that isn't answered below, feel free to leave it in the comments.
When I first started making jam, I overcooked it over and over again. Keep in mind that the jam will continue to thicken up once you take it off the heat! I can usually tell that the jam is ready once it starts to stick to the bottom of the saucepan.
You can also try putting a spoon or lid in the freezer, then dropping some of the jam on it. Run your finger or another utensil through the jam, and if the jam wrinkles, it’s usually ready (this video shows what that looks like).
Of course! I personally love to make jam when I have lots of extra berries lying around in the freezer. If you are using frozen strawberries, you can simply follow the recipe as written — it just might take a bit longer for the strawberries to break down.
Stored in an airtight container in the fridge, this jam will usually last up to 1 month. This time will vary, so keep an eye on it! You should toss the jam if you start seeing any mold growing on the top.
How to Store & Freeze
To store: You can store this jam in an airtight container in the fridge for up to 1 month.
To freeze: Let the jam cool completely at room temperature, then transfer to a jar or freezer-safe container. Be sure to leave at least ¾-inch free space at the top of the jar to allow for expansion in the freezer. Then, you can store the jam in the freezer for up to 6 months.
Love this recipe? Please leave a star rating and review in the comments below! And don't forget to subscribe to The Baker's Almanac for even more baking recipes and tips.
Print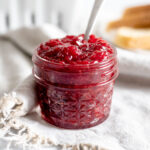
Easy Strawberry Jam (No Pectin)
- Total Time: 25 minutes
- Yield: 12 ounces 1x
Description
With only four ingredients, this easy strawberry jam couldn't be easier to make — and it doesn't require any pectin! Packed full of flavor from fresh strawberries, it beats the grocery store version any day.
Ingredients
- 2 ⅓ cups (460g) fresh or frozen strawberries, finely chopped
- ¾ cup (150g) granulated sugar
- 1 teaspoon lemon juice
- Pinch of kosher salt
Instructions
- In a medium saucepan, add the strawberries, granulated sugar, lemon juice, and kosher salt, and stir to combine. Heat mixture over high heat, stirring constantly with a heatproof spatula. Once the mixture starts to bubble up, reduce the heat down to medium-low.
- Cook the mixture for 10-15 minutes, stirring constantly, until the jam is thick and viscous. To test if the jam is ready, I usually like to run my spatula along the bottom of the saucepan in a straight line. If it takes more than a second for the line to fill back up, the jam is usually ready. I like to err on the side of caution and take the jam off almost too early — if it doesn't set enough, you can always return it back to the heat.
- Once ready, remove the jam from the heat and transfer it to a heatproof container. Let the jam cool completely at room temperature, then transfer it to the fridge.
- Stored properly in an airtight container, this jam will usually last for up to one month in the fridge and up to six months in the freezer.


Notes
- Cooking Time: Be careful not to overcook the jam or it will set too hard! Remember that jam will continue to cook once you take it off the heat, so you just want to remove it once it starts to thicken and stick to the bottom of the pan.
- Yield: I always like to make my jam in smaller amounts so that it doesn’t spoil. You can even cut this recipe in half if you want a smaller amount of jam. I also don't recommend doubling or tripling this recipe as that makes it more likely for the jam to burn while cooking.
- Prep Time: 10 minutes
- Cook Time: 15 minutes
- Category: Jam
- Method: Sauté
- Cuisine: American
I have made this jam many times. I prefer making in small batches as I am allergic to strawberries 🍓 but my husband loves them and strawberry jam. It cooks up great and lasts a long time in the frig. You can freeze it as well. I freeze mine in small (4 or 8 oz) WIDE mouth canning jars.
I'm so glad you (and your husband) been enjoying the recipe, Debbi! Thanks so much for taking the time to leave a review.
rI was wondering if I can water bath to preserve longer and without refrigeratoring or freezing?
Yes, you absolutely can! I would recommend following these instructions. I hope that helps!
Sorry to bother, but how much jam does this recipe make? I only need a little amount for a couple slices of bread.
Hi there! This recipe yields about 12 ounces of jam, so you'd definitely have extra left over. However, it usually lasts several weeks (up to a month) in the fridge.
How many jars of, say 350g, does this recipe make?
Hi, Wiktor! This recipe yields about 12 oz, which converts to about 340g. I hope that helps!
can you water bath this jam to just keep it on the shelf?
Yes, you absolutely can! I would recommend following these instructions. I hope that helps!
Can this jam be canned? If so how long would you process it?
Hi, Sheila! I personally haven't tried canning this jam yet, but I think you should be able to. I'd recommend following the instructions in this article for more guidance. I hope that helps!
Yum! Thanks Leslie, this was my first attempt at making jam, I found the method easy to follow and enjoyed making it. I actually added a teaspoon of dried mint flakes to the recipe, I think it works because it turned out great! It tastes and smells divine! Not only great on toast for breakfast, but makes a real treat spooned over ice cream too! Thank you.
I'm so glad you enjoyed the recipe, Jason! I love the idea of adding in dried mint flakes. I'll have to try doing that next time!
Hi I use stevia zero calorie sweetener for my strawberry jam it measure cup for cup just like sugar the one for cooking and baking. I like it!
That's great, Lisa — so glad to hear stevia worked well in this recipe for you! 😊
It's a perfect recipe. I was completely satisfied.
I'm so glad you enjoyed it, Mirtha!
Would be great to know how much sugar to use.
Hi, Jrnna! This recipe calls for 3/4 cup (150g) of granulated sugar, and it's listed in the recipe card in the 'Ingredients' section. Let me know if you're having trouble finding that!
I added a teaspoon of Chinese Five Spice powder and it was a great compliment to the strawberries and sugar. Thank you!
Ooh, what a great idea, George! So glad to hear you enjoyed the jam. 😊
I totally love this recipe. I'll so try it!
Meanwhile can I blend the strawberry in a blender instead of chopping it to fine pieces?
Hi there! You could definitely try blending the strawberries instead of chopping them. The more you blend them, the smoother the overall jam will be. I'd just recommend not blending them too finely as the strawberries will break down more as they're cooking on the stove.
Hi Leslie. I have never made jam in my life. My mum made all types when we where kids and I had forgotten how great home made was. Any way I grow my own delicious strawberries and just made up some jars following your recipe the only thing I cooked it for 20 minute until it was a deep blood red color. Had to stop myself eating as it cooked it was so great. Kind regards, Jim.
I'm so glad to hear you enjoyed the recipe, James! This jam is one of my favorites. 😊
Thank you for the recipe it turned so good. ❤️
I'm so glad you enjoyed it, Aakanksha! 😊
this jam is simple and i am honestly surprised how delicious it is!!! i will NEVER buy jam at the store again.
this jam is THE JAM!!
I'm so glad you enjoyed the jam! It's definitely one of my favorites. 😊
Can you make it sugar free
Hi, Josh!
I wouldn't recommend adjusting the amount of sugar in this recipe. Sugar helps the jam set and helps develop the flavor and texture of the recipe, so it's important to use the amount listed.
Perfect strawberry jam, just like my Russian great grandmother used to make in the summer! I used this recipe with (460g) of fresh picked strawberries and it came out amazing! The recipe calls for the perfect amount of each ingredient to ensure a natural taste that’s just right, not too sweet and not too sour. I used a smaller pot, so I had to stir on low heat for a little bit longer (an extra 15-20 minutes on low) but the flavor came out delicious! I also removed the foamy bits while I was stirring like my great grandma taught me so that the jam color would turn out translucent. I got these little 8oz jam jars at the store and filled one up with my yield. The next day, I tried the jam with some freshly buttered English muffins and felt like I was in a London coffee shop again, sipping tea along with a muffin topped with clotted cream and jam. Thanks Leslie for this flawless jam recipe! I will definitely be making jam again in the near future. Any tips for blueberries or peaches?
Aw thanks for the review ♡ I would love to have some of this jam with a scone and clotted cream! I'll have to work on more jam recipes with different fruits in the future. In the meantime, here's a recipe I have for Peach Cardamom Jam: https://thebakersalmanac.com/easy-peach-cardamom-jam/